Blog Archives
The Easiest Latkes You’ve Ever Had! A Tradition in the making…
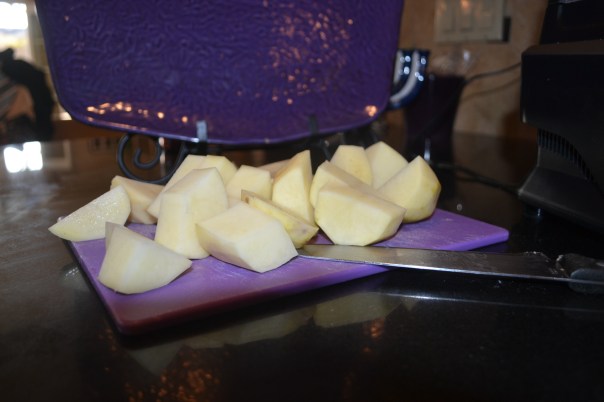
 Everyone knows Hanukkah means Potato Latkes fried in oil. Horror stories about bleeding knuckles scraped up from grating potatoes are aplenty. Except in my childhood house.
My mother always made these delicious fried pancakes in the blender; instead a thick puree fried to the same golden brown donned our Hanukkah table.
Aside from being oh so much easier…and safer, I always wondered why. Why do our latkes look different? I finally got the courage to ask why. The answer was so simplistic, it almost seemed silly. “Well,” said my mother, ” when I got married, I got a blender and that recipe came in the enclosed cookbook.” And that is how traditions are made.
This is truly the easiest latke recipe you will ever find. I hope you make them for your family.
Happy Hanukkah!

MOM’S FAMOUS POTATO LATKES
2 eggs
1 small onion, quartered
1 small onion
2 tbl. flour
1/4 tsp. baking powder
3 cups peeled and cubed RAW potatoes (I use Russet potatoes)
Vegetable or Corn Oil to fry
Sour cream (optional)
Applesauce (optional)
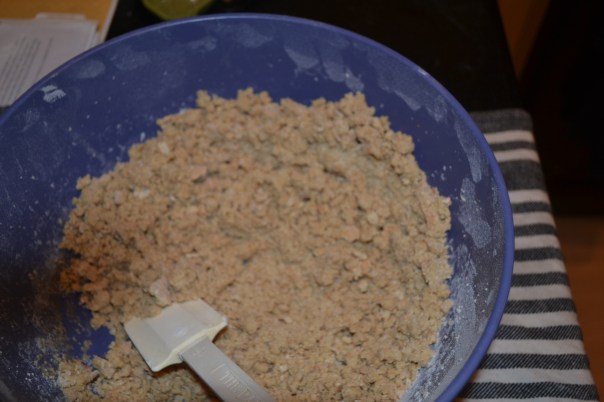
- Put the eggs, onion, salt, flour and baking powder in blender with 1/2 of the potatoes. Process on high until potatoes have gone through the blades.
- Add the rest of the potatoes and puree on high until the mixture is a thick puree.

- Heat up oil in a non-stick pan.
- Add small ladles of puree in the hot oil until crisp around the edges. Flip and fry the other side.

- Drain hot latkes on paper towels.
- Serve latkes hot with sour cream and applesauce.

Some More S’mores Please!
I am not a sweets lover. Give me a bag of potato chips and I’m a happy camper. That was until my friend Jen brought over her scrumptious S’mores Bars.
I wanted just the slightest bite from one of my kids bar. After taking the bite, the sky opened, the harps played and I thought I had died and gone to heaven. The slight bit of salt mixed into the sweet and sticky marshmallow, and that nostalgic bite of a Hershey bar all combined perfectly by a not overly sweet graham cracker dough. OMG!!!!!
Certainly this incredible mash-up must have been hiding in someone’s recipe vault for years. I had never …ever…heard of S’mores Bars before. But alas, it wasn’t. Jen found it online. She said her twins were wanting S’mores a lot and she just didn’t want to deal with the whole process of making them again and again. Building a fire or lighting the grill, finding something to roast the marshmallows on. And the sticky finger mess of two young kids…yup… I AGREE 100%.
Whatever magic led her to this amazingly delicious treat, I’m so thankful for it. So now let’s get cooking!
Baked S’mores
1/2 cup butter, room temperature
1/4 cup brown sugar
1/2 cup granulated sugar
1 large egg
1 tsp. vanilla
1 1/3 cups flour
3/4 cup graham cracker crumbs (approximately 7 full graham crackers)
1 tsp. baking powder
1/4 tsp. salt
2 or 3 super sized Hershey chocolate bars (plain)
1 1/2 cups marshmallow creme/fluff (not melted marshmallows)
Preheat Oven to 350 degrees. Grease bottom of an 11×7.
In a large bowl or stand mixer, cream together butter and sugar until light. Beat in egg and vanilla.

In a small bowl, whisk together flour, graham cracker crumbs ,baking powder and salt.
Add the flour mixture to the butter mixture and mix on low speed until combined.
Divide Dough in half. Press half of the mixture into an even layer on the bottom of the prepared pan.
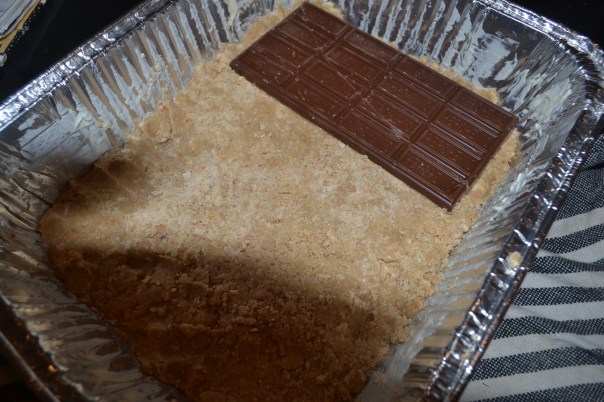
Place chocolate bars over dough in a single layer. You may have to break up the bar to make it fit.
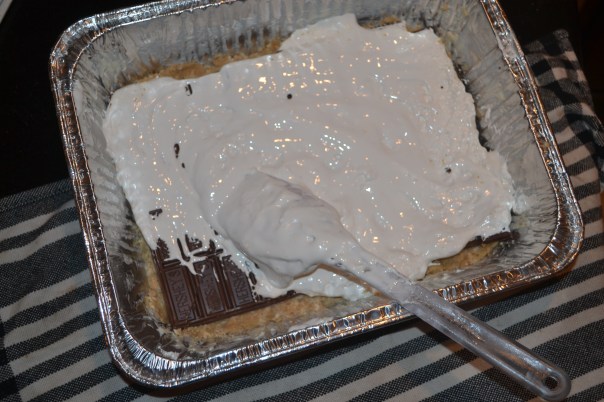
Spread marshmallow fluff evenly over the chocolate layer. Hint, grease your spreader with non stick spray or butter so it doesn’t stick too much.

Place remaining dough in a gallon size zip close baggie. Using your palms, or a rolling pin, flatten the dough out the full width and length of the baggie. Use scissors to cut three sides of the bag and open it up carefully and flip it on top of the marshmallow. Carefully peel the bag up. SPread the dough where it is uneven.

Bake for 30-35 minutes until lightly browned. Cool completely before cutting into the bars.
Devour!
Recipes, Recipes, Recipes!
I am a recipe hoarder. There. I said it! I love recipes from cookbooks, recipes from the local food section (what’s left of it anyway), recipes from magazines, recipes from food tv cooking shows and recipes from the internet. I can’t seem to get enough. I print them, cut them, file and store them. Once in a while, I actually try them.
My family loves new recipe days. A delicious home cooked meal waiting for them to return from their daily activities. Something different. Something creative. I love these days too. The problem is they seem to come fewer and far between lately. The heat of summer just hasn’t made me want to cook ANYTHING! The insanity of our weekly schedule has hardly afforded me the energy to sit down and plan anything unique.
I think often about the movie Julie & Julia. The film where Amy Adams, who plays Julie, starts on an adventure to cook through the entire collection of Julia Child’s first cookbook. She subsequently blogs about her daily adventure. I would love to try something aspiring like that. The only problem is I just can’t see myself cooking rabbit, offal and other questionable meats. I mean eeeeew! Maybe one day, I’ll cook myself through my thousands of recipes.
Motivation to try a new recipe, however, arrived last week thanks to The Pioneer Woman, Ree Drummond. I love her recipes. They usually involve way too many steps and pots and pans. But she posted this soup recipe that intrigued me. Ten Can Soup. That’s it. Ten Cans. Oh…and some Velveeta Cheese Product.
By personal choice, I usually don’t open a lot of cans and I avoid anything that includes a word indicating it is processed. But what the heck, I thought I’d give it a try. And I am so glad I did. My family loved it. Ad I literally put it all together in less than 15 minutes TOTAL!

Here is the recipe. Drop me a line and let me know what your family thinks.
TEN CAN SOUP
1 can meat only (no beans) chili ( I might use two next time)
1 can 15oz. kidney beans
1 can 15 oz. pinto beans
1 can 15 oz. black beans
1 can 15 oz. diced tomatoes
1 can 15 oz. corn (she used, as did I, Fiesta Variety)
1 can 10 oz. Rotel
Salt and Pepper to taste
8 oz. Velveeta, cubed.
Without draining the cans, dump them in a pot over high heat. The chili, kidney beans, pinto beans, black beans, diced tomatoes, corn and the Rotel.
Bring to a boil. Reduce the heat and simmer for 10-15 minutes. Add salt and pepper as needed.
Dice the cheese and stir it in.
Serve immediately.

Yup, that’s it! Enjoy!!!!
Warm Fragrant Spices
Warm fragrant spices. Creamy flavorful curries. Cool fresh Raita. Samosas. Tandoori Chicken. Aaah, Indian Food. My family loves it. But we’ve never cooked it. So how, does one even consider venturing into a completely new cuisine? Food Network’s Aarti Sequeira. Seriously.
Aarti was featured in, and eventually won Season Six of The Next Food Network Star. From the first episode we fell in love with her and knew she’d win. And we were fortunate enough to meet her a few weeks ago at the Los Angeles Times Festival of Books here in Los Angeles. Being the food geeks that we are, we purchased her new cookbook, Aarti Paarti, An American Kitchen with an Indian Soul, so she could sign it for us. Usually when you stand in a line for a book signing you are hustled along with such speed that the ink doesn’t have the chance to dry before you are scurried away. Not so with Aarti. She was so genuine and gracious. We told her we had never ventured into this type of culinary endeavor before and she actually opened the book to the recipe we should try first. It was her favorite growing up, she told us. She signed the book, took a picture and wished us well. We just love her!
The more stories I read in her book, the more I love her. We have a lot in common her and I. Aarti graduated from Northwestern University with a goal to enter the field of journalism. I wanted to go to Northwestern, but alas I do have the “J” degree (from CSUN). She came to a crossroads in her journalism career after leaving CNN and discovered her love for food. I went into Public Relations, had some kids and then at that crossroads in my life, decided that the world of food is where my heart is. We both realize that the stories and the memories that are derived from our cultural upbringings is what ties us to our ancestors. Her book is full of these stories. I highly recommend checking it out if you have ever been curious about the food of India.
So like I said, she told us to try Kheema. Her ground beef recipe, she told us, is traditionally made with ground lamb. I happened to have a boat load of ground turkey and so there you have it. The meat is not what makes this dish. It is the glorious spices that permeate your kitchen that make this dish the amazing thing that it is. And yet, it’s so simple.
Kheema
(recipe printed with permission from Aarti Sequeira)
3 Tbl. Sunflower Oil
1 medium onion, finely diced (about 1/2 cup)
4 cloves garlic, minced (about 4 tsp)
1 (1 inch) piece fresh ginger, peeled and minced (about 1 Tbl.)
2 tsp. ground coriander
1 tsp. paprika
1/2 tsp. garam masala
1/2 tsp. ground cumin
1/4 to 1/2 tsp. cayenne
1 pound ground beef ( Aarti recommended lamb and we used ground turkey)
2 medium ripe tomatoes, chopped (about 1 cup) or 1 cup canned, diced fire-roasted tomatoes, drained
1/4 cup water
Kosher salt and freshly ground black pepper
1/2 cup frozen peas
2 tsp. malt vinegar or apple cider vinegar
1/4 chopped fresh cilantro leaves and soft stems

All my ingredients ready to go for this yummy and simple dish
In a large skillet, warm the oil over medium high heat until it shimmers. Add the onions and sauté until their golden brown, about 5 minutes. (her time was 5…it took me closer to 10/15 minutes to get them the brown that she talks about). Add the garlic and ginger, cook, stirring often, for another minute, then add the coriander, paprika, garam masala, cumin and cayenne. Sauté, stirring often to keep the spices from burning, for about 30 seconds.

Spices are added to the carmelized onions
![GetAttachment[1]](https://fridaybrews.com/wp-content/uploads/2015/03/getattachment1.jpg)
Onion and spice mixtture

I served the final dish with some store bought Naan that I found at Trader Joes.
*some of these harder to find spices can be located at Indian, Ethnic stores or online
Solita Tacos & Margaritas: Authentic Baja Food comes to Santa Clarita
I love a good story and the story behind how the new local restaurant Solita was formed is no exception.
Two Baja Mexico-going surfers fell in love with the street food in Baja Mexico and wanted to bring it to California, ala restaurant style. They went, of all places, to a book store and found a cookbook on Baja style cooking. Then they called the Chef/Author who, ironically had a similar desire and dream. And thus the partnership between Matt Baumayr, Rich Howland and Chef Deborah Schneider began.
First they opened Sol. An upscale, highly- rated Mexican restaurant that focuses on the fresh flavors of Baja Mexico. Then another one. Finally, their patrons, who loved the food, requested a new concept. One where they could eat every week. Every day if they wanted. A slightly lower-end version of the highly acclaimed original. And Solita was born.
Last week I was invited to preview the newest Solita Tacos & Margaritas location in Valencia that opens today. What a treat. Fresh authentic flavors that fill your taste buds. Schneider manages to change the Mexican food landscape here in Santa Clarita with the touch of her pans. With a focus on fresh and sustainable food, accented with a variety of chilies Solita brings all three partner’s fiery passion and Chef Schneider’s James Beard Nominated talent to our corporate-restaurant filled town.
Even the margaritas are hand-crafted. The Watermelon margarita, described on the menu as a simple and refreshing cocktail made with Aguavales Blanco tequila, crushed watermelon and fresh lime juice, was amazing. You could taste the fresh fruit. We enjoyed it with the Tequila shrimp and Avocado Sundae; lightly cooked shrimp with Blanco tequila, salsa fresca, lime juice and chipotles layered with Marta’s creamy avocado sauce in a sundae glass. This creamy sundae filled with fresh shrimp had just the right amount of tang and spice to make it a perfect blend.

We also enjoyed the Wood-Grilled fajitas.

And the Lazy enchilada.

For more info http://www.solitatacos.com.
Solita Tacos & Margaritas opens today in Valencia Town Center.
Be Creative!! Be Inspired!!
I have a secret! I have a crush on Tim Holtz. He is amazing. Whether I watch him on television, Youtube or live and in person, he inspires me. Every. Single. Time.

Tim Holtz
For those of you that aren’t familiar with him, Tim Holtz is an artist. He works for scrapbook and rubber stamp companies like Stampers Anonymous, Sizzix and Ranger Ink, designing stamps, die-cuts and multi-media materials like ink and paint. He then travels the world to demonstrate how to use these materials and tools. He’s written books. He’s re-designed scissors and lamps. He’s a genius. Both artistically and marketing-wise. I mean the man touches a product and millions of screaming fans buy it sight unseen.
When I am not in the kitchen cooking, I am at least dreaming about being in the craft room creating. Cards, scrapbooks…doesn’t matter as long as I am being creative. And here is where I fell in love with Mr. Holtz all over again yesterday.
I went to a Rubber Stamp Convention yesterday with my girlfriend Julie. We went to be inspired, but mainly we went to see Tim. Of course his totally insane fans made it difficult to see what he was doing. These relentless women wouldn’t budge an inch so we couldn’t see what amazing projects he was creating. But we could hear him. And what he said was just what I needed to hear.
Mr. Holtz talked about being sad that he gets comments on his blog posts and in person about people not being able to find the time to be crafty. He questioned what kind of life we are leading if we can’t even find one hour a month to do something for ourselves. And he’s right on the money.
“You just create. You gotta play!”-Tim Holtz
He offered a great suggestion. Schedule one hour a week…or one hour a month, even if it is in 20 or 30-minute increments and just do one thing. Just die-cut shapes. Then the next scheduled period just ink. After all the steps are complete your last appointment with yourself should be to assemble your pieces into the final project. Repeat.

This type of scheduling could work for any project that you can’t seem to “get to”. But for me, being creative is key.
Thanks Tim for once again inspiring me!
Happy Birthday Tradition
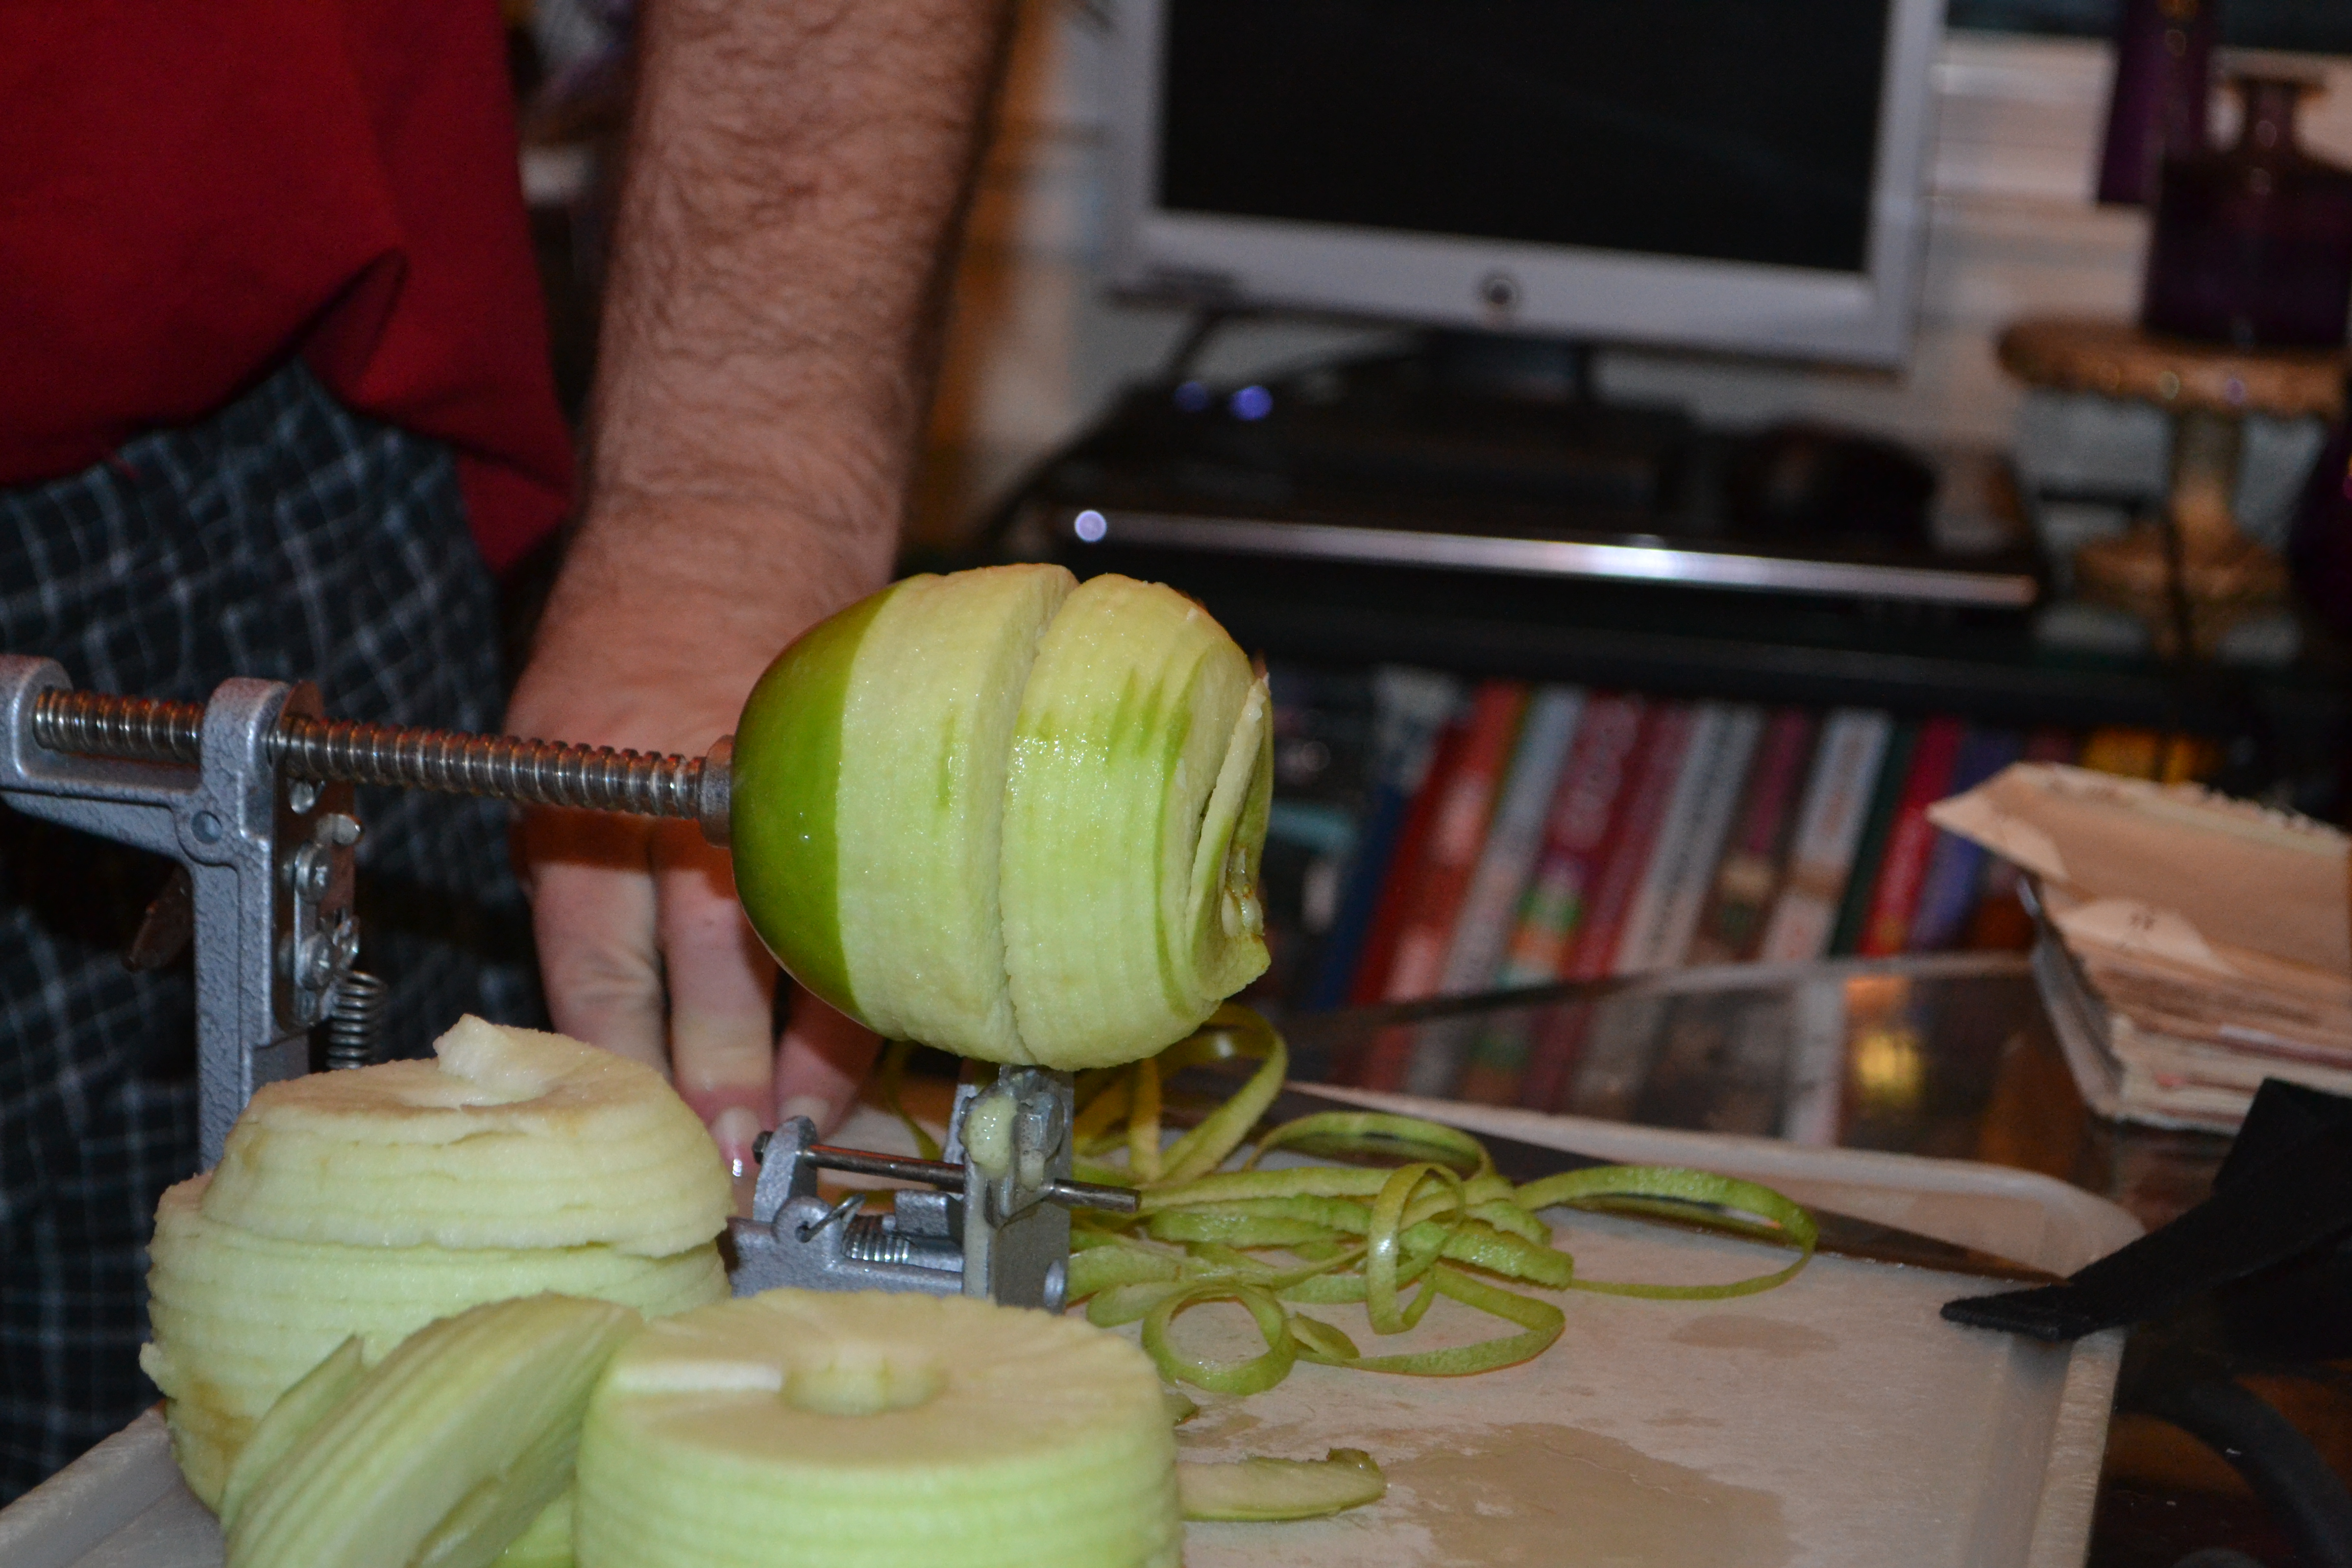
We like to use the apple peeler-corer-slicer tool
Traditions are huge in our family, and none more important than the Annual Birthday Breakfast in Bed Tradition.
This luxury began when I was young. My parents would knock on our door and wake us up, singing Happy Birthday and carrying a tray with eggs or pancakes adorned with whipped cream and maraschino cherry happy faces. Every Mothers Day, Fathers Day and birthday. So it seemed natural to continue this tradition with my own family.
Each family member gets their favorite breakfast delivered to them annually.
My husband, being a simple guy, enjoys his bagels with lox and cream cheese. We often try to spice it up with fruit and maybe some other smoked fish or whatever gourmet treat we can find. (Mainly to make it look special, but also out of some secret guilt that the only effort other than shopping for the ingredients is to cut a bagel in half.)
Me? I am partial to Eggs Benedict. Since I am gluten free, my husband has created his own personalized version of it for me; a perfectly poached egg placed delicately on a nice crispy hash brown and some imported prosciutto, topped with an extra lemony hollandaise sauce. Heaven.
The kids count down the days until their favorite breakfast. A puffed Apple Pancake. Nothing else. This light soufflé-like, oven-baked egg dish is full of fresh apples bathed in butter and brown sugar. It is similar to what is often referred to as a Dutch Baby or a German Apple Pancake.
According to AboutFood.com, “The word “Dutch” comes from a mispronunciation of “deutsch,” not from Germany’s northern neighbor. The Pennsylvania Dutch migrated from southwestern Germany and Switzerland in the 17th and 18th centuries.”
Researching the actual orgin and history of this breakfast food will make your head spin. No one can agree exactly where or when or who created this masterpiece. The origin of my family recipe was from a diner in San Diego, California called Ricky’s Family Restaurant.
This little hole-in-the-wall breakfast joint was a “Must” for all our family vacations in San Diego when I was growing up. It’s one of those places that evokes so many memories and so much nostalgia when you walk in. You just know most of those waitresses were there when you were ten. I couldn’t wait to take my own family there.
Anyways, after the first visit or two, my parents went on a mad search to find that recipe. While my mom never re-created it exactly, she got pretty close. This is the Gershman-Wiesen version that has been served up for close to four decades. I hope you get to serve it to your own loved ones for many special occasions.
6 eggs
1 1/2 cups milk
1 cups flour
3 TBL. sugar
1 tsp. Vanilla
1/2 tsp. salt
1/4 lb. butter
2 apples
5 TBL. brown sugar.
2 TBL. cinnamon
Pre-heat 425 degrees.
In the deep dish pie dish, melt the butter with the brown sugar and cinnamon.

While you wait for the butter and brown sugar to melt together, peel and core the apples. Then cut them into thin slices.
We like to use the apple peeler-corer-slicer tool
Add apples to pie dish and coat with butter and brown sugar mixture and return to oven for 10 minutes.

In blender add eggs, milk, flour, regular sugar, vanilla and salt. Blend until all mixed up.

Gently pour the egg mixture over the apples in the pan and return to oven for 20-25 minutes.
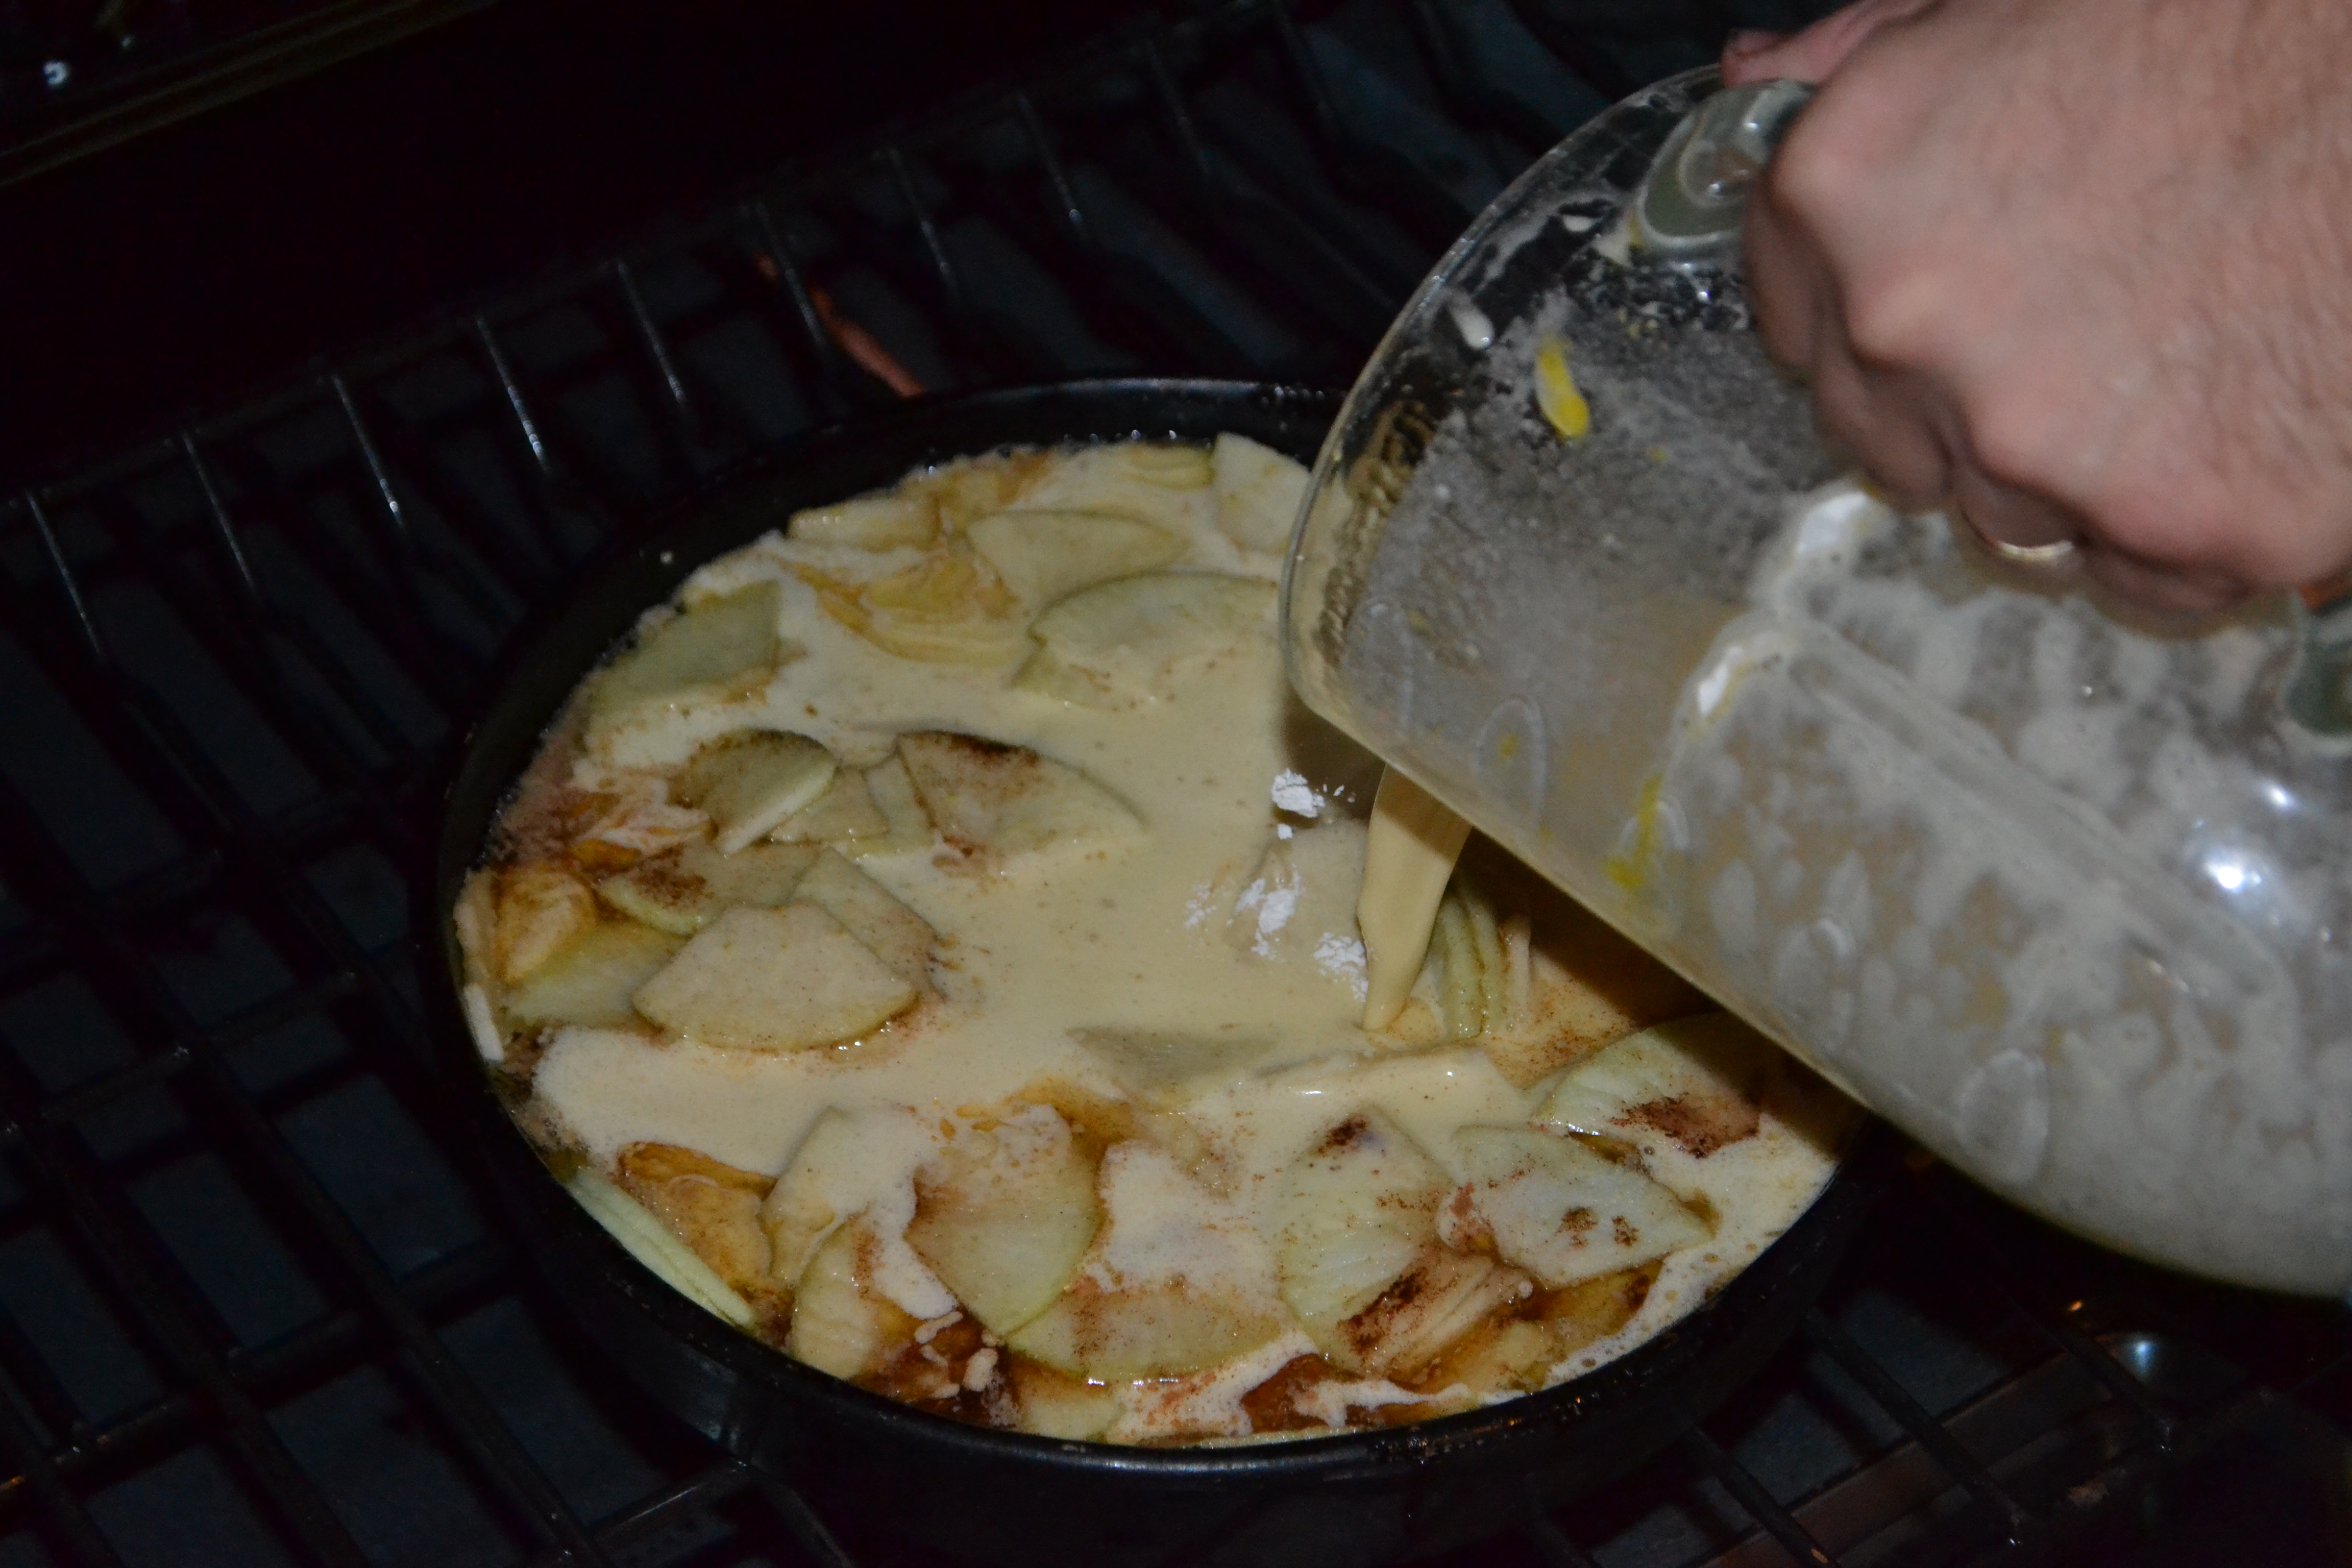
The sides should puff up like a soufflé and the center will be slightly firm.

Enjoy.
Baba’s Eggplant
I love watching the Food Network and the Cooking Channel. Save for those silly “game show” style competitions, I could watch it all day long. And have.
Perhaps it is my love to try new recipes or my love for learning about family traditions and cultures, or maybe even my silly dream to have gone to culinary school.
So I suppose it might not surprise you that I was watching Food Network in the dentist office a few weeks ago. Although I do watch it during my cleanings, this time it was my son’s turn. I was in the waiting room. What surprised ME was my reaction.
I was watching Trisha Yearwood’s show, Trisha’s Southern Kitchen. I just love the things she cooks and the stories she tells. This episode was about her childhood hero, Olympic Gold Medal winner Nadia Comaneci and her medal winning husband Bart Conner. In the episode, Trisha had invited them over for lunch and made a whole gold medal inspired lunch, pork medallions, pineapple upside cake and her family’s traditional grits. Nadia brought one of her traditional dishes,”Salata de Vinete” or eggplant salad spread.
I saw the picture and I turned to my 18 year old and screamed, “That’s my baba’s eggplant!” I couldn’t believe my eyes.
Perhaps I should shine a little bit of light on the excitement. My baba was an old fashioned cook, as most of our grandmothers were. She cooked three meals…good old fashioned food. Since she died when I was 12, most of my memories of her are of me standing on a chair watching, or helping her prepare dish after delicious dish. I inherited most of her recipes. One of my most treasured possessions.
As much as I remember her eggplant, I don’t EVER remember her making it. The only reason it even evoked any emotions is that my great aunt (my grandmother’s sister-in-law) Judy loved that eggplant. Decades after my grandmother died, Aunt Judy was on a mad rush to find the recipe. She talked about it every single summer, nearly every week, as we drove on our annual pilgrimage to the Hollywood Bowl. I was somehow determined to find it for her. Judy now has Alzheimer’s. Our Bowl trips have stopped. And darn it if I’m still determined to re-create this eggplant dish for her.
So back to Nadia. She’s from Romania and my ancestors hail from that neck of the woods. Well, Russia to be exact, but I’m sure they must share recipes. The thing that sold me on this dish was just how Nadia made it. She didn’t whip out her food processor or her modern tool-chopper to puree the eggplant. She used a regular old chef’s knife. Just one. And she chopped and chopped, almost in a haphazard manner, until the baked eggplant was finely minced, almost mashed.
That’s how they cooked in the “pre-Cuisinart” times. Don’t get me wrong, I adore my food processor. But there is something magical about the way things used to be done.
Next stop, bringing it to my Aunt to see what kind of warm memories it evokes in her.
Nadia’s Eggplant Salad Spread
2 medium eggplant
1/4 cup olive oil (+more if needed)
2 TBL. lemon juice ( I used 3 or 4)
1 small onion, finely chopped
2 TBL mayonnaise
Kosher salt and pepper to taste
Dill for garnish
DIRECTIONS
Preheat the oven to 400 degrees F.
Pierce the eggplant skins in several places with a fork. Set the eggplant on a baking sheet and roast until the eggplant is soft and the skin is charred. (about 30-45 minutes)
When done, cut the stems off of the eggplant. Cut a slit along the side of each eggplant and transfer the eggplants to a strainer for a couple of minutes to allow the juices to drain.
Finely chop the eggplants with a knife until they form a smooth puree. Add the eggplant puree to a bowl and stir in the olive oil and lemon juice. Add the onion and mix the mayonnaise, adding more if needed. Season with salt and pepper and garnish with dill and refrigerate for at least one hour to chill.
To see what else was cooking in Trisha’s kitchen go to http://www.foodnetwork.com/shows/trishas-southern-kitchen/400-series/gold-medal-meals.html
